When multiple boards are connected to the CT bus, you must set up a bus clock to synchronize timing between them. In addition, you can configure alternative (or fallback) clock sources to provide the clock signal if the primary source fails.
This topic describes:
To create a robust clocking configuration, you must understand basic clocking concepts such as clock mastering and fallback. This topic assumes that you have a basic understanding of clocking. For a complete overview of board clocking, refer to the NMS OAM System User's Manual.
This topic describes the rules and limitations that apply to setting up CT bus clocking on CX 2000 boards.
CX 2000 boards do not have direct access to any external source to derive a timing reference. Thus the NETWORK timing reference is not directly available to these boards. The only timing source available to CX 2000 boards is OSC.
Note: It is also possible to configure a CX 2000 board to use NETREF as a timing reference. However, a simpler solution is to have the board driving NETREF serve as the clock master instead, and eliminate use of these signals.
If another board has access to an outside clock signal, use this board as the clock master. CX 2000 boards are best used as clock masters only if none of the boards on the H.100 bus have any access to an outside digital clock signal (for example, if your system contains only boards with analog trunk interfaces). In this case, the CX 2000 board can drive A_CLOCK or B_CLOCK using its internal oscillator (OSC) as the timing reference. Refer to Examples for a sample system configuration with one CX 2000 board and two AG 4000 or AG 4040 boards.
When a CX 2000 board is configured as the system primary clock master:
The board's first timing reference must be set to a NETREF clock or OSC.
The board's fallback timing reference must be set to a NETREF reference or OSC.
When a CX 2000 board is configured as the system secondary clock master:
The board's first timing reference must be the system's primary clock.
The board's fallback timing reference must be set to a NETREF source or OSC.
When a CX 2000 board is configured as a clock slave:
The board's first timing reference must be the system's primary clock.
The board's fallback timing reference must be the system's secondary clock.
Refer to Other clocking capabilities for more options.
The following tables summarize the CT bus clocking capabilities of the CX 2000 board:
|
Capability |
Yes/No |
Comments |
|---|---|---|
|
Serve as primary master |
Yes |
|
|
Drive A_CLOCK |
Yes |
|
|
Drive B_CLOCK |
Yes |
|
|
Available primary timing references: |
||
|
NETREF1 |
Yes |
The application must reconfigure the board as soon as possible if NETREF1 fails. |
|
NETREF2 |
No |
This board does not support NETREF2. |
|
OSC |
Yes |
|
|
Fallback to secondary timing reference |
Yes |
|
|
Available secondary timing references: |
||
|
NETREF1 |
No |
|
|
NETREF2 |
No |
This board does not support NETREF2. |
|
OSC |
Yes |
|
|
Capability |
Yes/No |
Comments |
|---|---|---|
|
Serve as secondary master |
Yes |
|
|
Drive A_CLOCK |
Yes |
If the primary master drives B_CLOCK, the secondary master drives A_CLOCK. |
|
Drive B_CLOCK |
Yes |
If the primary master drives A_CLOCK, the secondary master drives B_CLOCK. |
|
Available secondary timing references: |
||
|
NETREF1 |
Yes |
|
|
NETREF2 |
No |
This board does not support NETREF2. |
|
OSC |
Yes |
|
|
Capability |
Yes/No |
Comments |
|---|---|---|
|
Serve as slave |
Yes |
|
|
Slave to A_CLOCK |
Yes |
|
|
Slave to B_CLOCK |
Yes |
|
|
Available fallback timing references: |
||
|
A_CLOCK |
Yes |
|
|
B_CLOCK |
Yes |
|
|
Capability |
Yes/No |
Comments |
|---|---|---|
|
Drive NETREF1 |
Yes |
|
|
Drive NETREF2 |
No |
This board does not support NETREF2. |
|
Operate in standalone mode |
Yes |
|
You can configure board clocking in your system in one of two ways:
|
Method |
Description |
|---|---|
|
Using clockdemo application model |
Create an application that assigns each board its clocking mode, monitors clocking changes, and reconfigures clocking if clock fallback occurs. A sample clocking application, clockdemo, is provided with Natural Access. clockdemo provides a robust fallback scheme that suits most system configurations. clockdemo source code is included, allowing you to modify the program if your clocking configuration is complex. For more information about clockdemo, refer to the NMS OAM System User's Manual. Note: Most clocking applications (including clockdemo) require all boards on the CT bus to be started in standalone mode. |
|
Using board keywords (with or without application intervention) |
For each board on the CT bus, set the board keywords to determine the board's clocking mode and to determine how each board behaves if clock fallback occurs. This method is documented in this topic. Unlike the clockdemo application, which allows you to specify several boards to take over mastery of the clock when another board fails, the board keyword method allows you to specify only a single secondary master. For this reason, the board keyword method is best used to implement clock fallback in your system, or in test configurations where clock reliability is not a factor. The board keyword method does not create an autonomous clock timing environment. If you implement clock fallback using this method, an application must still intervene when clock fallback occurs to reset system clocking before other clocking changes occur. If both the primary and secondary clock masters stop driving the clocks, and an application does not intervene, the boards default to standalone mode. |
Choose only one of these configuration methods across all boards on the CT bus. Otherwise, the two methods interfere with one another, and board clocking may not operate properly.
Board keywords enable you to specify the clocking role of each CX 2000 board in a system in the following ways:
System primary clock master
System secondary clock master
Clock slave
Standalone board
You can also use board keywords to establish clock fallback sources.
The following tables describe how to use board keywords to specify clocking configurations on multiple-board or multiple-chassis systems. Refer to Examples for sample configurations.
Use the following board keywords to configure a CX 2000 board as the primary clock master.
Note: A CX 2000 board should not be used as primary or secondary clock master unless no board in the system has access to an external timing reference. Use these settings only if another board has access to an external timing reference, and the CX board must act as clock master. This configuration is not recommended.
|
Keyword |
Description |
|---|---|
|
Specifies the source from which this board derives its timing. Set this keyword to a network source (NETREF or OSC). | |
|
Specifies the CT bus clock that the board drives. Set this keyword to either A_CLOCK (MASTER_A) or B_CLOCK (MASTER_B). | |
|
Enables or disables clock fallback on the board. Set to YES if Clocking.HBus.ClockSource is set to NETREF. Otherwise, set to NO. | |
|
Specifies an alternate timing reference to use when the master clock source fails. Set this keyword to a timing source other than the one specified with Clocking.HBus.ClockSource: NETREF or OSC. |
Note: If the primary master's first source fails and then returns, the board's timing reference switches back to the first timing source. This is not true for the secondary clock master.
Use the following board keywords to configure a CX 2000 board as the secondary clock master.
Note: A CX 2000 board should not be used as primary or secondary clock master unless no board in the system has access to an external timing reference. Use these settings only if another board has access to an external timing reference, and the CX board must act as clock master. This configuration is not recommended.
|
Keyword |
Description |
|---|---|
|
Specifies the source from which this board derives its timing. Set this keyword to the clock driven by the primary clock master. For example, if the primary master drives A_CLOCK, set the keyword to A_CLOCK. | |
|
Specifies the CT bus clock that the secondary master drives. Set this keyword to the clock not driven by the primary clock master (MASTER_A or MASTER_B). | |
|
Enables or disables clock fallback on the board. Set this keyword to YES. | |
|
Specifies an alternate timing reference to use when the master clock does not function properly. Set this keyword to a timing reference not used by the primary clock master: NETREF or OSC. |
Note: If the primary master's timing reference recovers, the secondary master continues to drive the clock referenced by all clock slaves in the system until the application intervenes.
Use the following board keywords to configure a CX 2000 board as a clock slave:
|
Keyword |
Description |
|---|---|
|
Specifies the CT bus clock from which the board derives its timing. Set this keyword to SLAVE to indicate that the board does not drive any CT bus clock (although the board can still drive NETREF). | |
|
Specifies the source from which this clock derives its timing. Set this keyword to the clock driven by the primary clock master (A_CLOCK or B_CLOCK). | |
|
Enables or disables clock fallback on the board. Set this keyword to YES. | |
|
Specifies the alternate clock reference to use when the master clock does not function properly. Set this keyword to the clock driven by the secondary clock master (B_CLOCK or A_CLOCK). |
To configure a CX 2000 board in standalone mode so the board references its own clocking information, set Clocking.HBus.ClockMode to STANDALONE. In standalone mode, the board uses only its own oscillator as a timing signal reference. However, the board cannot make switch connections to the CT bus.
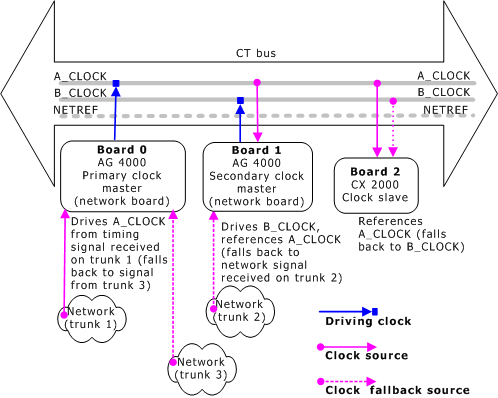
The following example assumes a system configuration in which one CX 2000 board and two AG 4000 or AG 4040 boards reside in a single chassis. The boards are configured in the following way:
|
Board |
Configuration |
|---|---|
|
Board 0 |
AG 4000 or AG 4040 board. Primary bus master. Drives A_CLOCK, based on signal from network (trunk 1). Falls back to signal from network (trunk 3). |
|
Board 1 |
AG 4000 or AG 4040 board. Secondary bus master. Drives B_CLOCK, based on signal from A_CLOCK. Falls back to signal from network (trunk 2). |
|
Board 2 |
CX 2000 board. Clock slave to A_CLOCK (auto-fallback enabled). |
This configuration assigns the following clocking priorities:
|
Priority |
Timing reference |
|---|---|
|
First |
Board 0, digital trunk 1. A network signal from a digital trunk provides the primary master clock source. |
|
Second |
Board 0, digital trunk 3. A network signal from a digital trunk provides the primary master clock source. |
|
Third |
Board 1, digital trunk 2. A network signal from a digital trunk provides the secondary master clock fallback source. |
The following illustration shows this configuration:
The following table shows board keywords used to configure the boards according to the configuration shown in the preceding illustration:
|
Board |
Role |
Clocking keyword settings |
|---|---|---|
|
0 |
Primary clock master |
Clocking.HBus.ClockMode = MASTER_A Clocking.HBus.ClockSource = NETWORK Clocking.HBus.ClockSourceNetwork = 1 Clocking.HBus.AutoFallBack = YES Clocking.HBus.FallBackClockSource = NETWORK Clocking.HBus.FallBackNetwork = 3 |
|
1 |
Secondary clock master |
Clocking.HBus.ClockMode = MASTER_B Clocking.HBus.ClockSource = A_CLOCK Clocking.HBus.AutoFallBack = YES Clocking.HBus.FallBackClockSource = NETWORK Clocking.HBus.FallBackNetwork = 2 |
|
2 |
Clock slave |
Clocking.HBus.ClockMode = SLAVE Clocking.HBus.ClockSource = A_CLOCK Clocking.HBus.AutoFallBack = YES Clocking.HBus.FallBackClockSource = B_CLOCK |
In this configuration, Board 0 is the primary clock master and drives A_CLOCK. All slave boards on the system use A_CLOCK as their first timing reference. Board 0 references its timing from a network timing signal received on its own trunk 1. Board 0 also uses the network timing signal from its own trunk 3 as its clock fallback source. This means that if the network timing signal derived from its own digital trunks fails, Board 0 continues to drive A_CLOCK based on the timing reference from trunk 3.
If, however, both of the signals used by Board 0 fail, Board 0 stops driving A_CLOCK. The secondary master (Board 1) then falls back to a timing reference received on its own trunk 2, and uses this signal to drive B_CLOCK. B_CLOCK then becomes the timing source for all boards that use B_CLOCK as their backup timing reference. The primary master also attempts to slave to B_CLOCK.
Note: For this clock fallback scheme to work, all the clock slaves must specify A_CLOCK as the clock source, and B_CLOCK as the clock fallback source.
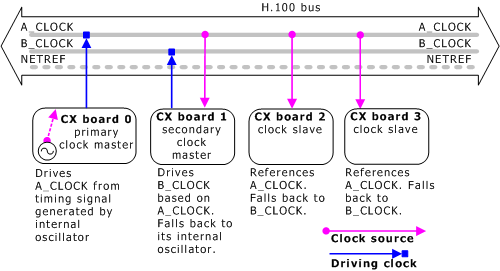
The following example assumes a system configuration in which four CX 2000 boards reside in a single chassis. The boards are configured in the following way:
|
Board |
Configuration |
|---|---|
|
Board 0 |
Primary clock master. Drives A_CLOCK, based on signal from internal oscillator. Auto-fallback disabled. |
|
Board 1 |
Secondary clock master. Drives B_CLOCK, based on signal from A_CLOCK. Falls back to its internal oscillator. |
|
Board 2 |
Clock slave to A_CLOCK. Falls back to B_CLOCK. |
|
Board 3 |
Clock slave to A_CLOCK. Falls back to B_CLOCK. |
The following illustration shows this configuration:
The following table shows board keywords used to configure the boards according to the configuration shown in the preceding illustration:
|
Board |
Role |
Clocking keyword settings |
|---|---|---|
|
0 |
Primary clock master |
Clocking.HBus.ClockMode = MASTER_A Clocking.HBus.ClockSource = OSC Clocking.HBus.AutoFallBack = NO |
|
1 |
Secondary clock master |
Clocking.HBus.ClockMode = MASTER_B Clocking.HBus.ClockSource = A_CLOCK Clocking.HBus.AutoFallBack = YES Clocking.HBus.FallBackClockSource = OSC |
|
2 |
Clock slave |
Clocking.HBus.ClockMode = SLAVE Clocking.HBus.ClockSource = A_CLOCK Clocking.HBus.AutoFallBack = YES Clocking.HBus.FallBackClockSource = B_CLOCK |
|
3 |
Clock slave |
Clocking.HBus.ClockMode = SLAVE Clocking.HBus.ClockSource = A_CLOCK Clocking.HBus.AutoFallBack = YES Clocking.HBus.FallBackClockSource = B_CLOCK |
In this configuration, Board 0 is the primary master and drives A_CLOCK. All slave boards on the system use A_CLOCK as their first timing reference. Board 0 references its timing from a signal derived from its oscillator. Auto-fallback is disabled for this board.
Board 1 is the secondary master, driving B_CLOCK based on A_CLOCK. If Board 0 stops driving A_CLOCK, Board 1 continues driving B_CLOCK based upon its internal oscillator.
All other boards are slaves to A_CLOCK. If Board 0 stops driving the clock, all boards fall back to B_CLOCK, which is driven by Board 1. If Board 1 stops driving B_CLOCK, all boards fall back to their internal oscillators.
Applications can poll clock status with swiGetBoardClock periodically to capture snapshots of the board clock status and to detect clocking events, such as the loss of a source. While most boards provide an instantaneous clock status, CX boards provide a latched clock status, which locks in the clock status until it is cleared. When polling the clock status on a CX 2000 board, swiGetBoardClock reports a status of BAD on each clock source that experienced an error any time since the last configuration command was issued. To clear the errors and refresh the status information, an application must call swiConfigBoardClock. For information about using these functions, refer to the Switching Service Developer's Manual.
The sample swish script that follows shows a strategy for obtaining the most current clock status:
#
# Obtaining fresh clock status on CX 2000 boards.
#
# When querying clocks on most boards, the query returns an
# instantaneous clock status. CX 2000 is different in that it latches
# clock errors when they occur. Errors remain latched until the next
# configuration command is issued. In some cases the latched data
# is stale and fresher status is desired. This example swish script
# shows how to use a query-config-query strategy for obtaining fresh
# status.
#
# Initialize clocking
#
OpenSwitch b1 = cxsw 1
ConfigBoardH100Clock b1 type=h100 source=h100_a h100mode=slave fallback=enable fallbacksource=h100_b
# When polling clock status:
# Query clocks to obtain current clock configuration, ignoring status
# Re-issue same clock configuration for purpose of clearing error latches
# Query clocks to obtain fresh status
#
QueryBoardClock b1 type=h100
ConfigBoardH100Clock b1 type=h100 source=h100_a h100mode=slave fallback=enable fallbacksource=h100_b
QueryBoardClock b1 type=h100