
This section describes, in detail, how to set up the JSR 309 Connector environment:
For system requirements and supported platforms, see System Requirements.
This section describes the installation instructions for OCCAS 5.0. This installation illustrates how to install OCCAS in order to be able to go to the next step of Installing the JSR 309 Connector.
Note: If you are familiar with OCCAS or planning to deploy on an existing OCCAS setup, proceed to Installing the JSR 309 Connector.
This section does not go into details of OCCAS, but simply will help build an OCCAS system which could be used for verification purposes.
Steps to complete on OS level include:
Install MySQL database
Set up SSH for file configuration
Enable NTP (Network Time Protocol)
Enable ports in firewall (if applicable)
Note: The ports that are required to be enabled in the firewall include SIP, TCP, and UDP ports 5060 and 5061 as well as 7001 which will be used by OCCAS.
If you need more details on OCCAS, refer to the OCCAS installation instructions available from www.oracle.com.
Here are some highlights of the necessary steps:
Modify the /etc/hosts file:
xxx.xxx.xxx.xxx 'hostname'
Note: This must be the first line in the /etc/hosts file. If not, you might encounter "503 Service Unavailable" error.
Make sure the database starts upon reboot:
chkconfig --levels 235 mysqld on
Specify set-variable=lower_case_table_names=1 in /etc/my.cnf.
service mysqld restart
Create a schema or database user for the Converged Application Server Location Service data source.
Create a schema or database user for the User Service and Security Service data sources.
Note: Make a note of the databases, users, and passwords as you will need them to complete the installation process.
mysql> CREATE DATABASE casls;
mysql> CREATE DATABASE usss;
mysql> GRANT ALTER, CREATE, DELETE, INDEX, INSERT, LOCK TABLES, SELECT, UPDATE ON casls.* TO 'caslsuser'@'hostname' IDENTIFIED BY 'password' WITH GRANT OPTION;
mysql> GRANT ALTER, CREATE, DELETE, INDEX, INSERT, LOCK TABLES, SELECT, UPDATE ON usss.* TO 'usssuser'@'hostname' IDENTIFIED BY 'password' WITH GRANT OPTION;
Note: hostname
– should be defined in /etc/hosts
file as following:
xxx.xxx.xxx.xxx 'hostname'
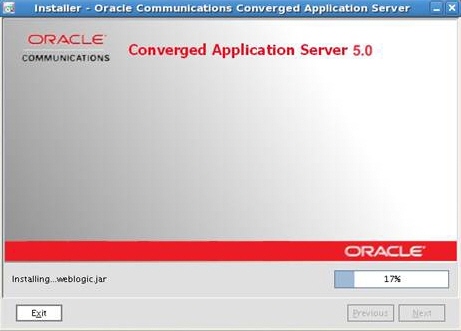
Run the occas500_ja_linux32.bin file.
Note: You may need to change permissions in order for the file to be executable.
Click on Next.

Select Create a new Middleware Home then click on Next.
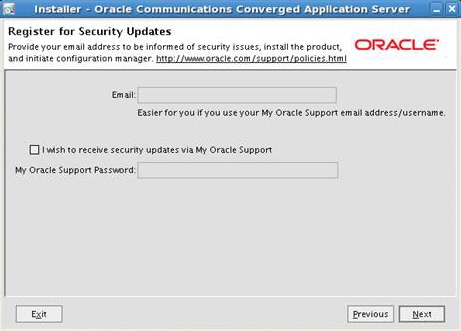
De-select security updates (unless you have an account with Oracle) then click on Next.
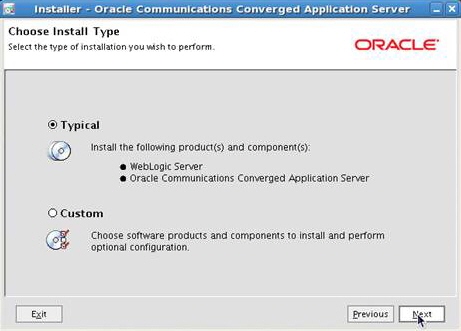
Select Typical then click on Next.
Click on Next.
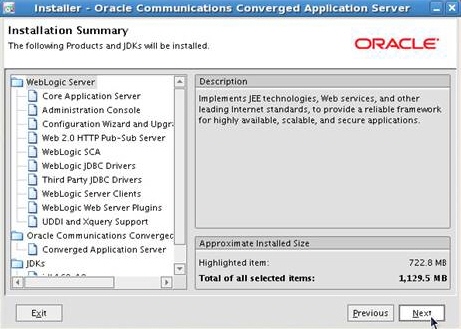
Click on Next.
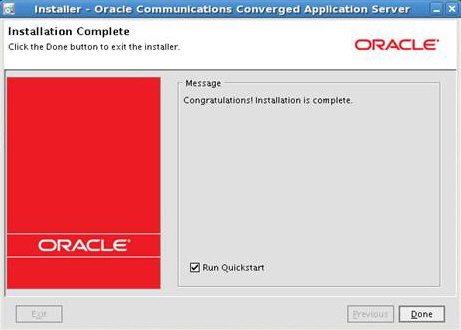
Select Run Quickstart then click on Done.
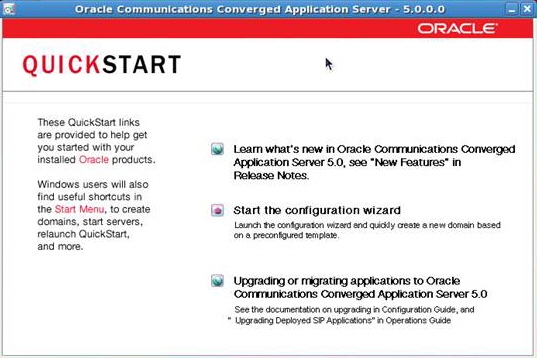
Click on Start the configuration wizard.

Select Create a new WebLogic domain then click on Next.
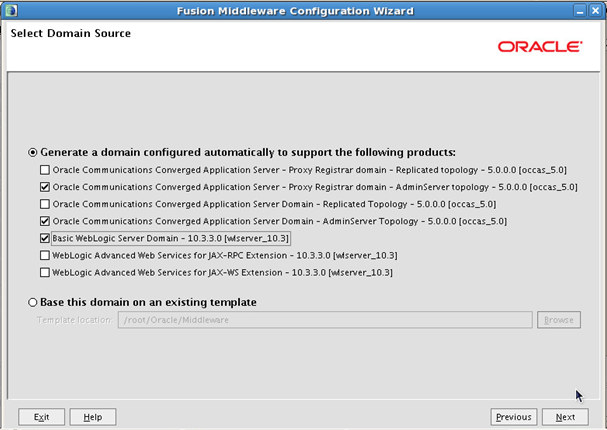
Select Generate a domain configured automatically to support the following products and choose the following selections then click on Next.
Oracle Communications Converged Application Server - Proxy Registrar domain - AdminServer topology
Oracle Communications Converged Application Server Domain - AdminServer topology
Basic WebLogic Server Domain
Click on Next.
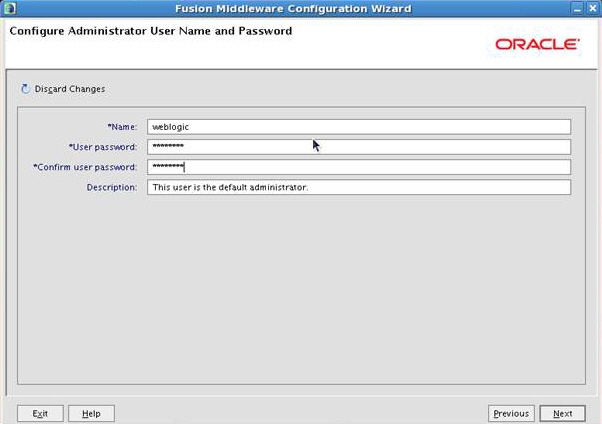
Specify Name and User password then click on Next.
The following is used as an example:
Name: weblogic
User password: Webl0gic!! ("0" is a zero)
Note: A strong password is required.
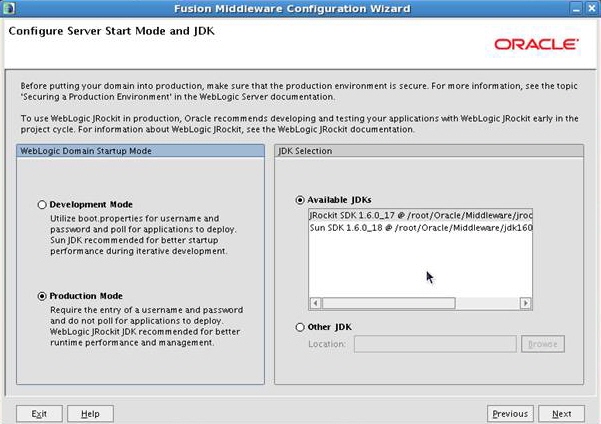
Select Production Mode under WebLogic Domain Startup Mode.
Select Available JDKs under JDK Selection and ensure that JRockit SDK is selected then click on Next.
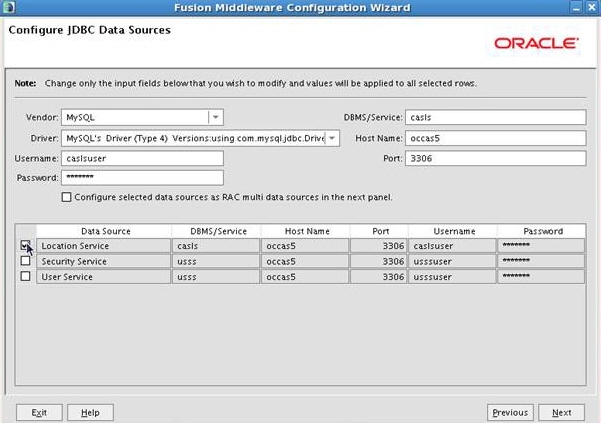
Select Location Service then fill out the information. The information from MySQL databases, users, and passwords will be used.
Note: The information used is taken from Database Creation.
Vendor: MySQL
Driver: <as listed on screen shot above>
Username: caslsuser
Password: <password>
DBMS/Service: casls
Host Name: occas5
Port: 3306

Select Security Service and User Service then fill out the information. The information from MySQL databases, users, and passwords will be used.
Note: The information used is taken from Database Creation.
Vendor: MySQL
Driver: <as listed on screen shot above>
Username: usssuser
Password: <password>
DBMS/Service: usss
Host Name: occas5
Port: 3306
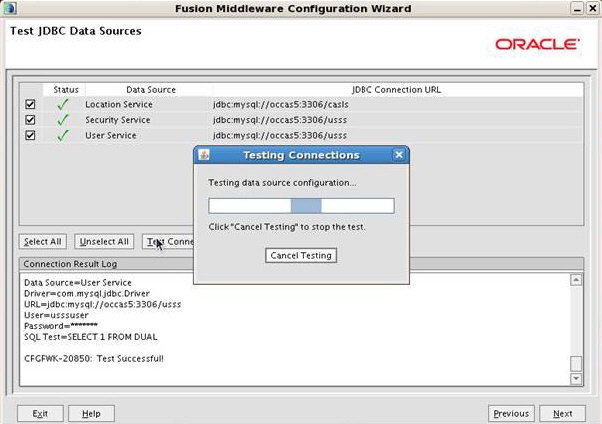
In this step, the OCCAS installation will verify if the database is set up correctly. Make sure the testing passes. If successful, click on Next.
Click on Next.

Click on Next.
Click on Create.
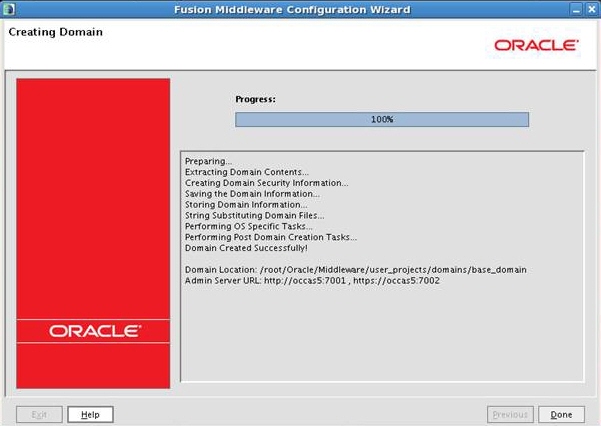
The installation is complete. Click on Done.
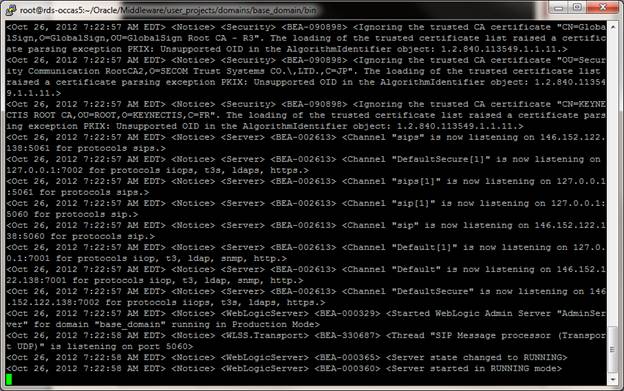
To start OCCAS, go to the Domain Location:
/root/Oracle/Middleware/user_projects/domains/base_domain/bin

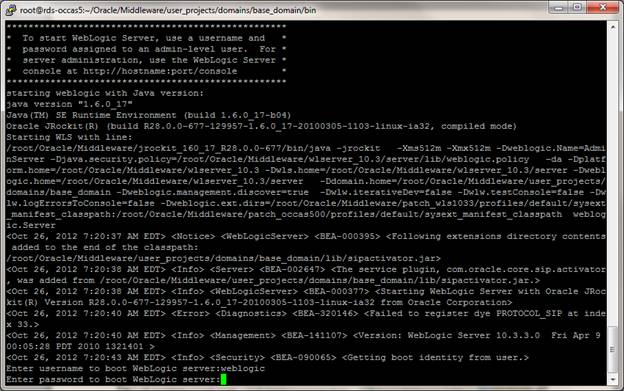
Access the Administration Console to verify the installation at:
http://<OCCAS5-IP-ADDRESS>:7001/console
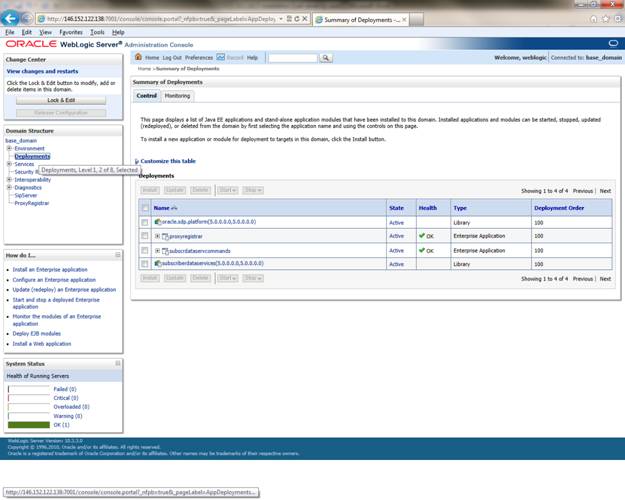
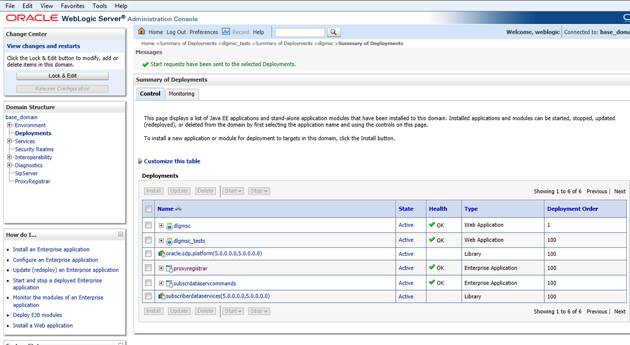
Go to Domain Structure and click on Deployments to make sure State and Health are similar to screen shot above.
Follow this procedure to get the application (WAR file) in an OCCAS environment to correctly load the JSR 309 Connector (dlgmsc.jar).
The JSR 309 Connector supports the new PowerMedia XMS via the MSML protocol. When using this release, the mediaserver.msType=XMS attribute must be set to XMS. This will load the correct connector implementation.
Extract the .tgz distribution package for this release which will create a <Release Package>/lib directory.
Note: <Release Package> refers to the .tgz distribution package provided for this release.
Copy the following .jar files from <Release Package>/lib directory to your <Domain Location>/lib directory:
Note: <Domain Location> refers to the domain path as specified during OCCAS installation.
JAR File |
Description |
lib/ dlgmsc.jar |
An archive which contains the JSR 309 Connector implementation for the PowerMedia XMS. |
lib/ msmltypes.jar |
MSML XML Bean Java Object. Required by the dlgmsc.jar. |
lib/ log4j-1.2.15.jar |
Third-party software for logging. |
lib/ jain-sip-sdp-1.2.91.jar |
Third-party software; SDP library used by the JSR 309 Connector implementation. |
lib/ slf4j-api-1.7.2.jar |
Support for Simple Logging Facade framework. Note: Refer to www.slf4j.org/manual.html for more information on different available logging implementations. |
lib/ slf4j-log4j12-1.7.2.jar |
Support for Simple Logging Facade framework implementation using log4j. Note: Refer to www.slf4j.org/manual.html for more information on different available logging implementations. |
Set up the properties file (dlgmscTemplate.properties). In order for applications to work, you must configure IP addresses and ports for the JSR 309 Connector and the PowerMedia XMS.
Follow these steps to set up the properties file:
Create a user directory. For example:
/root/user1
Note: This is a directory which will
be accessible from the OCCAS to JSR 309 Connector
configuration files.
Copy the dlgmsc-log4j-sample.properties file from <Release Package>/about-log4j to /root/user1.
Make a copy of the dlgmscTemplate.properties
file which is part of the distribution. Place this file in any directory
that is accessible by the OCCAS. For example:
/root/user1/user1_dlgmsc.properties
Edit this properties file according to your needs. Change the
IP and port values for the JSR 309 Connector
and the PowerMedia XMS
to match the following setup:
# Connector's address information (typically same as the SipServlet
container)
connector.sip.address=xxx.xxx.xxx.xxx
connector.sip.port=5060
# Media Server's address information
mediaserver.msType=XMS
mediaserver.1.sip.address=xxx.xxx.xxx.xxx
mediaserver.1.sip.port=5060
Edit the <Domain
Location>/bin/startWebLogic.sh OCCAS startup script. Look
for the following line:
CLASSPATH="${SAVE_CLASSPATH}"
Add the following four lines directly after:
export
DLG_PROPERTY_FILE=/root/user1/user1_dlgmsc.properties
LOG4J_OPTIONS="-Dlog4j.configuration=file:/root/user1/dlgmsc-log4j-sample.properties"
XQUERYPATH=/root/Oracle/Middleware/modules/features/weblogic.server.modules.xquery_10.3.3.0.jar
CLASSPATH="${SAVE_CLASSPATH}:${ORCL_HOME}/server/modules/mscontrol.jar:${ORCL_HOME}/server/lib/jsr309-descriptor-binding.jar:${XQUERYPATH}"
Add the following line in OCCAS startup script to enable some
of the relevant items and to disable serialization (highlighted in
bold):
${LOG4J_OPTIONS}
-Dlog4j.debug -Dwlss.local.serialization=false
from:
if
[ "${WLS_REDIRECT_LOG}" = "" ] ; then
echo "Starting
WLS with line:"
echo "${JAVA_HOME}/bin/java
${JAVA_VM} ${MEM_ARGS} -Dweblogic.Name=${SERVER_NAME} -Djava.security.policy=${WL_HOME}/server/lib/weblogic.policy
${JAVA_OPTIONS} ${PROXY_SETTINGS} ${SERVER_CLASS}"
${JAVA_HOME}/bin/java
${JAVA_VM} ${MEM_ARGS} -Dweblogic.Name=${SERVER_NAME} -Djava.security.policy=${WL_HOME}/server/lib/weblogic.policy
${JAVA_OPTIONS} ${PROXY_SETTINGS} ${SERVER_CLASS}
else
echo "Redirecting
output from WLS window to ${WLS_REDIRECT_LOG}"
${JAVA_HOME}/bin/java
${JAVA_VM} ${MEM_ARGS} -Dweblogic.Name=${SERVER_NAME} -Djava.security.policy=${WL_HOME}/server/lib/weblogic.policy
${JAVA_OPTIONS} ${PROXY_SETTINGS} ${SERVER_CLASS} >"${WLS_REDIRECT_LOG}"
2>&1
fi
to:
if
[ "${WLS_REDIRECT_LOG}" = "" ] ; then
echo "Starting
WLS with line:"
echo "${JAVA_HOME}/bin/java
${JAVA_VM} ${MEM_ARGS} -Dweblogic.Name=${SERVER_NAME} ${LOG4J_OPTIONS}
-Dlog4j.debug -Dwlss.local.serialization=false -Djava.security.policy=${WL_HOME}/server/lib/weblogic.policy
${JAVA_OPTIONS} ${PROXY_SETTINGS} ${SERVER_CLASS}"
${JAVA_HOME}/bin/java
${JAVA_VM} ${MEM_ARGS} -Dweblogic.Name=${SERVER_NAME} ${LOG4J_OPTIONS}
-Dlog4j.debug -Dwlss.local.serialization=false -Djava.security.policy=${WL_HOME}/server/lib/weblogic.policy
${JAVA_OPTIONS} ${PROXY_SETTINGS} ${SERVER_CLASS}
else
echo "Redirecting
output from WLS window to ${WLS_REDIRECT_LOG}"
${JAVA_HOME}/bin/java
${JAVA_VM} ${MEM_ARGS} -Dweblogic.Name=${SERVER_NAME} ${LOG4J_OPTIONS}
-Dlog4j.debug -Dwlss.local.serialization=false -Djava.security.policy=${WL_HOME}/server/lib/weblogic.policy
${JAVA_OPTIONS} ${PROXY_SETTINGS} ${SERVER_CLASS} >"${WLS_REDIRECT_LOG}"
2>&1
fi
For more details on disabling serialization, refer to Disabling
Serialization.
Save the properties file then restart the WebLogic Server.
Copy dlgmsc_tests.war from <Release Package>/applications to /root/user1 (or any other directory which will be accessible by OCCAS).
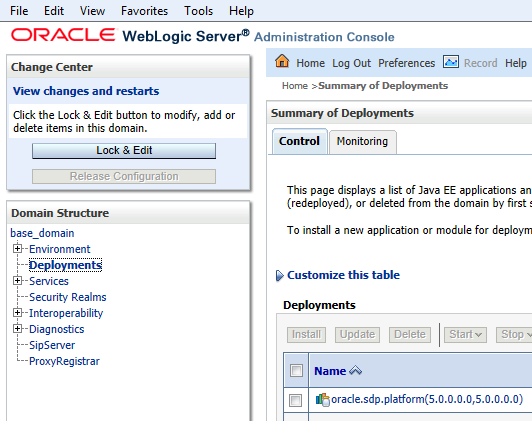
Go to Deployments under Domain Structure then click on Lock & Edit.

Click on Install under Deployments.

Change the Path to /root/user1 by clicking on root under Current Location and then user1.

Select dlgmsc_tests.war then click on Next.
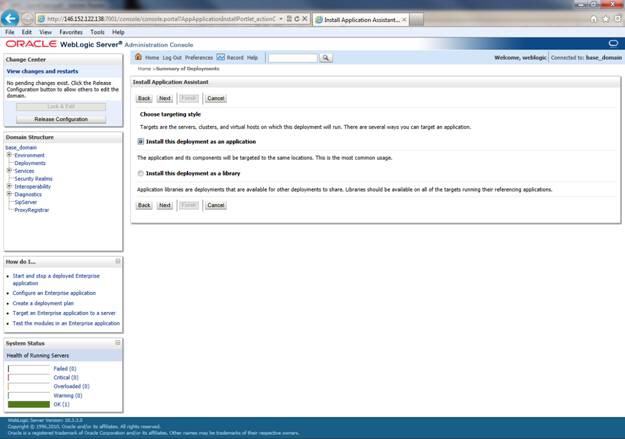
Select Install this deployment as an application then click on Next.
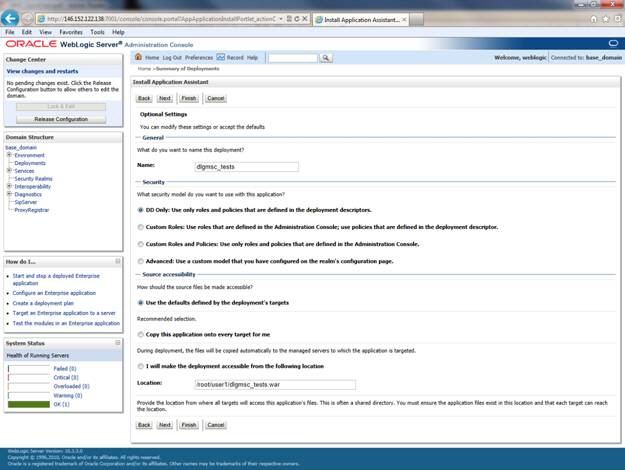
Select I will make the deployment accessible from the following location then click on Next.
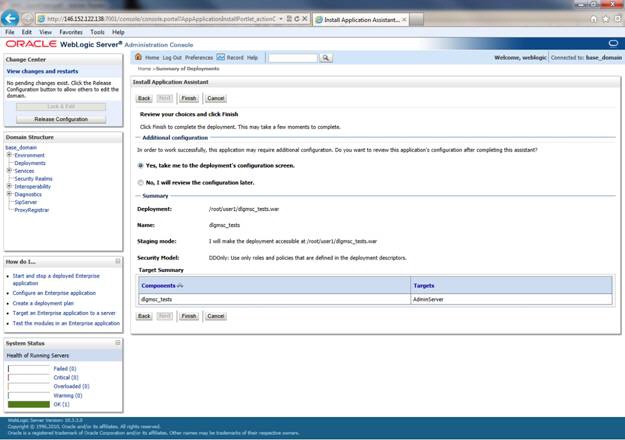
Click on Finish.
Click on Save then Activate Changes.
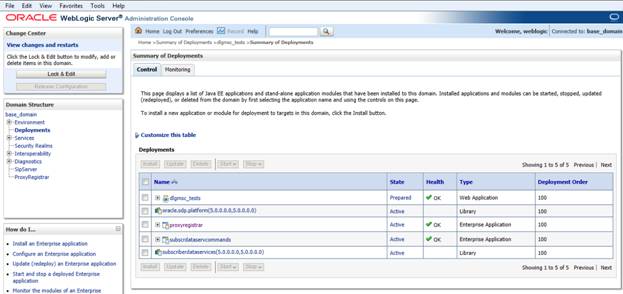
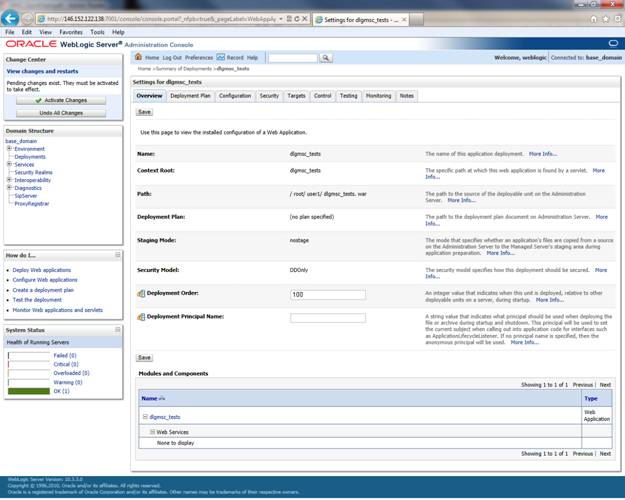
Go back to Deployments under Domain Structure to verify that dlgmsc_tests.war is in a Prepared State.
Click on Start then Servicing All Requests.
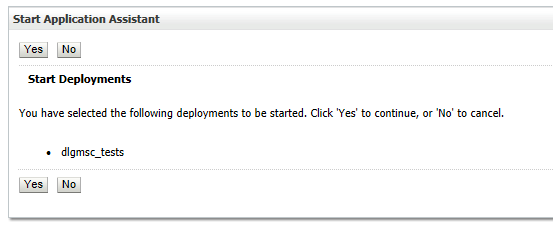
Click on Yes.
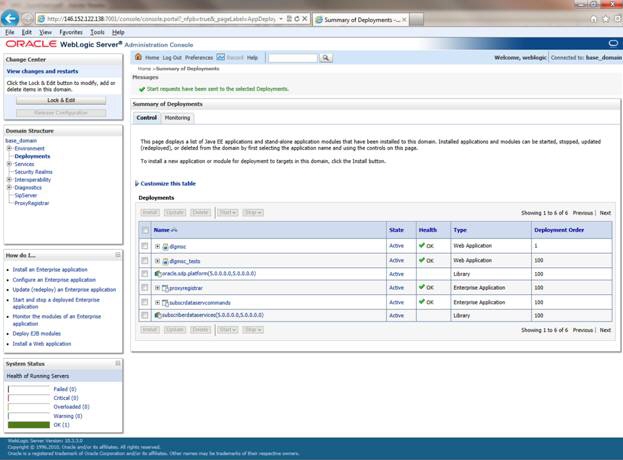
Verify that deployed dlgmsc_tests.war application is in Active State.
Test servlets are provided to illustrate the use of the JSR 309 Connector. Since these test servlets will be using media files, you have to upload files to the PowerMedia XMS which will be used in this setup.
To use the media files, extract mscdemoprompts.tgz in the PowerMedia XMS under /var/lib/xms/media/en-US/verification directory. This will extract the media files in the appropriate subdirectories.
For illustration purposes, let's remove the proxyregistrar deployment for a proof of concept setup.
Select Deployments under Domain Structure then click on Lock & Edit.
Select proxyregistrar box to Stop.
This will move proxyregistrar from Active State to Prepared State.
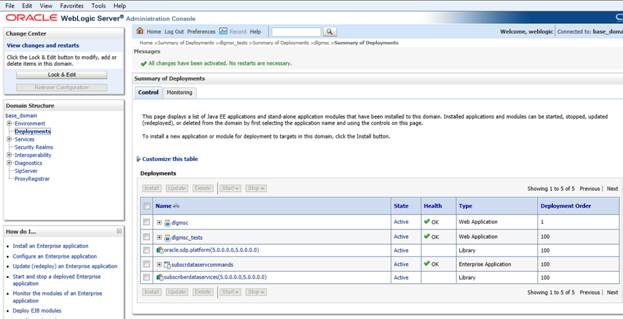
Select proxyregistrar box again then select Delete.
Click on Activate Changes.
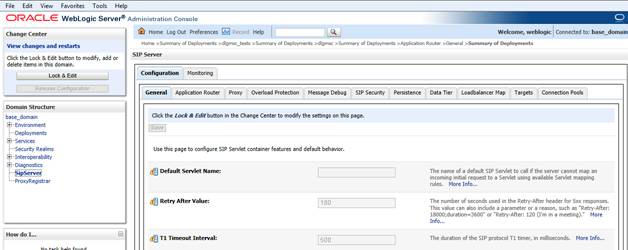
Select SipServer under Domain Structure.
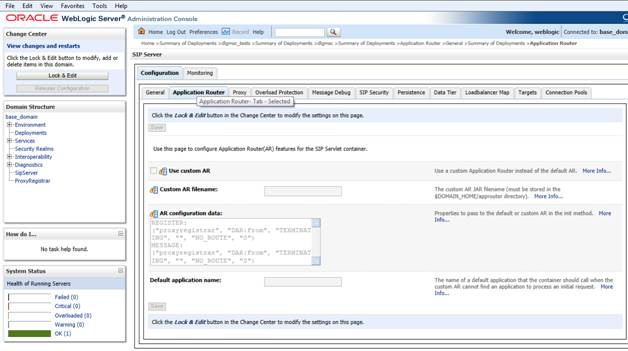
Select Application Router under Configuration.
Click on Lock & Edit.
Delete content from AR configuration data and click Save then Activate Changes.
To verify that your installation is successful, you can dial into OCCAS and run a simple demo included with the JSR 309 Connector which will play a file.
To test the application, dial the following:
player@<OCCAS5-IP-ADDRESS>
If it is successful, you will hear a "Please contact your service provider" prompt.