This section describes the test servlets (basic sample applications) and requirements for running test servlets in the JSR 309 Connector.
Test servlets are provided to illustrate the use of the JSR 309 Connector. These test servlets are included in the dlgmsc_tests.war.
Please read the copyright notice included with the test servlets.
You can locate and install the demo prompts by performing the following:
Copy the mscdemoprompts.tgz file to the PowerMedia XMS machine.
Unzip the file to /tmp directory.
Locate the ./snow directory after the unzip.
Move /tmp/snow to /var/lib/xms/media/en_US/verification to install the demo prompts.
As an alternative method, you can install the demo prompts using the PowerMedia XMS web interface which allows you to upload one file at a time.
Note: When installing via the PowerMedia XMS web interface upload page, the directory structure must be identical to the unzip directory.
SIP URIs are required to set up the SIP phone in order for the servlets to work. This information is available in the sip.xml file, which is included in the dlgmsc_tests.war. Verify that the media files have been installed on PowerMedia XMS.
You can locate and access the sip.xml file by performing the following:
Create a temp directory.
Copy the dlgmsc_tests.war and then run jar –xvf dlgmsc_test.war inside the temp directory.
Access the file contents located in ./WEB-INF/sip.xml.
This test servlet plays a PowerMedia XMS pre-set prompt.
Set up your SIP phone to point to the Web Application Server. Configure the SIP phone address (i.e. user name) to player. Make sure that the Web Application Server is running the dlgmsc_tests.war application.
In the SIP phone, select your newly created contact. You will hear the following announcement once: "Please contact your service provider". After the completion of the announcement, the application hangs up the call.
To test the application, dial the following:
player@<OCCAS5-IP-ADDRESS>
This test servlet plays a prompt and collects DTMF digits.
Set up your SIP phone to point to the Web Application Server. Configure the SIP phone address (i.e. user name) to dtmfPromptCollect. Make sure that the Web Application Server is running the dlgmsc_tests.war application.
In the SIP phone, select your newly created driver test contact. You can barge-in by pressing four DTMF digits. The application collects and prints the four digits to the dlgmsc.log file and immediately hangs up.
The DTMF collection is matching 770. Entering this combination, the prompt will stop playing and the application completes by hanging up the phone. Otherwise, any other combination of digits will not stop the application until the timeout is reached.
To test the application, dial the following:
dtmfPromptCollect@<OCCAS5-IP-ADDRESS>
This test servlet records a greeting.
Set up your SIP phone to point to the Web Application Server. Configure the SIP phone address (i.e. user name) to recorder. Make sure that the Web Application Server is running the dlgmsc_tests.war application.
In the SIP phone, select your newly created test contact. You are prompted to record your greeting at the tone. After the tone, say your greeting, and enter #000 to play your greeting.
After the greeting is played back, the application completes by hanging up the phone. If you do not enter #000, the greeting continues to record until the timeout is reached.
To test the application, dial the following:
recorder@<OCCAS5-IP-ADDRESS>
This test servlet illustrates the asynchronous DTMF capabilities.
Set up your SIP phone to point to the Web Application Server. Configure the SIP phone address (i.e. user name) to asyncDtmf. Make sure that the Web Application Server is running the dlgmsc_tests.war application.
In the SIP phone, select your newly created test contact. Notice that there are no prompts. You will be connected. The application waits for you to press DTMF digits. For each DTMF pressed, the application will receive the DTMF and print the collected DTMF to the screen.
Selecting the number 0 hangs up the connection.
To test the application, dial the following:
asyncDtmf@<OCCAS5-IP-ADDRESS>
The following table depicts the conference demos that are delivered with JSR 309 Connector.
Demo Name |
Functionality |
Requires |
JMCConferenceServlet |
Uses mixer conference control leg. See possible functionality see menu. |
Media files needs to be installed in the PowerMedia XMS for menu to work. |
DialogicQuickConferenceDemo |
Does not use a mixer conference control leg and legs directly enter into conference – no initial IVR. |
Media files needs to be installed in the PowerMedia XMS for menu to work. |
DialogicBridgeConference |
Shows how to create a two leg conference without using a mixer. |
Media files needs to be installed in the PowerMedia XMS for menu to work. |
DlgcReferenceConferenceDemo |
Creates a conference using a non-control leg setup. |
Media files needs to be installed in the PowerMedia XMS for menu to work. |
This test servlet illustrates a conference using a mixer control leg. A mixer control leg is an extra SIP connection used to control the conference mixer.
Set up your SIP phone to point to the Web Application Server. Configure the SIP phone address (i.e. user name) to DialogicConferenceDemo. Make sure that the Web Application Server is running the dlgmsc_tests.war application.
In the SIP phone, select your newly created test conference contact. Notice that you will need at least two SIP phones. The first connection entering the conference will not hear anything until the other legs join in.
This conference performs the following:
Establishes a network connection and joins it with a media group.
Plays a prompt for new number (conference pin) and collects signals. Any pin number can be provided. Initially no conferences exist. Conferences are created as users call in and provide pin numbers. Callers will only hear other callers who provide the same pin number.
Creates a conference if a new pin is used, or adds a leg to an existing conference.
After the leg is in the conference, the user can enter DTMF *06. This unjoins the leg from the conference then plays an announcement "The size of the conference is". After the play completes, the leg is automatically joined back to the conference.
If the user enters DTMF *02, this unjoins the leg from the conference then plays an announcement "The call leg has been unjoined from the conference". Note in this case the leg stays unjoined from the conference until it is put back into the conference by the user entering DTMF *03.
After the leg is unjoined from the conference by entering DTMF *02, the user can rejoin the leg to the conference by entering DTMF *03. Before joining the leg back to the conference, an announcement "The call leg has rejoined the conference" is played. After the play completes, the leg rejoins the conference.
To test the application, dial the following:
DialogicConferenceDemo@<OCCAS5-IP-ADDRESS>
This test servlet illustrates how to implement a simple conference that does not required a mixer control leg and the legs are connected directly into a conference without requiring any initial IVR functionality.
Set up your SIP phone to point to the Web Application Server. Configure the SIP phone address (i.e. user name) to DialogicQuickConferenceDemo. Make sure that the Web Application Server is running the dlgmsc_tests.war application.
In the SIP phone, select your newly created test conference contact. Notice that you will need at least two SIP phones. The first connection entering the conference will not hear anything until the other legs join in.
This simple conference performs the following:
It basically joins the two legs into conference.
Once in conference, the user can enter *00 to hear the conference menu and apply some of the menu options.
Menu Supported by DialogicQuickConferenceDemo:
*00 - Plays announcement of menu options then goes back into conference
*01 - Allows the user to toggle between mute/unmute
*02 - Allows the user to unjoin the conference
*03 - Allows the user to rejoin the conference
*05 - Plays a song – Once the song completes, the leg goes back into conference
*06 - Plays announcement of "The conference size is"
*99 - Allows the user to stop any plays and return back to conference
To test the application, dial the following:
DialogicQuickConferenceDemo@<OCCAS5-IP-ADDRESS>
This test servlet illustrates how to implement a conference that does not required a mixer control leg and the legs are connected directly into a conference without requiring any initial IVR functionality.
Set up your SIP phone to point to the Web Application Server. Configure the SIP phone address (i.e. user name) to DlgcReferenceConferenceDemo. Make sure that the Web Application Server is running the dlgmsc_tests.war application.
In the SIP phone, select your newly created test conference contact. Notice that you will need at least two SIP phones. The first connection entering the conference will not hear anything until the other legs join in.
This simple conference performs the following:
Can join multiple legs into a conference.
Once in conference, the user can enter *00 to hear the conference menu and apply some of the menu options.
Menu Supported by DlgcReferenceConferenceDemo:
*00 - Plays announcement of menu options then goes back into conference
*01 - Allows the user to toggle between mute/unmute
*02 - Allows the user to unjoin the conference
*03 - Allows the user to rejoin the conference
*05 - Plays a song – Once the song completes, the leg goes back into conference
*06 - Plays announcement of "The conference size is"
*99 - Allows the user to stop any plays and return back to conference
The user can change the initial direction of legs by entering the following properties in the application JSR 309 Connector property file:
demos.join.direction.leg1=<duplex,recv,send>
demos.join.direction.leg1=<duplex,recv,send>
demos.join.direction.leg1=<duplex,recv,send>
To test the application, dial the following:
DlgcReferenceConferenceDemo@<OCCAS5-IP-ADDRESS>
This test servlet illustrates how to implement a simple conference that does not required a mixer. That is two legs are directly joined into a conference.
Set up your SIP phone to point to the Web Application Server. Configure the SIP phone address (i.e. user name) to DialogicBridgeDemo. Make sure that the Web Application Server is running the dlgmsc_tests.war application.
In the SIP phone, select your newly created test conference contact. Notice that you will need at least two SIP phones. The first connection entering the conference will not hear anything until the other legs join in.
This simple conference performs the following:
It basically joins two calling legs into a simple conference.
In order for the leg to enter the bridge, each leg must enter *03 after making the call.
To test the application, dial the following:
DialogicBridgeDemo@<OCCAS5-IP-ADDRESS>
This test servlet is similar to the DialogicBridgeConference defined above, except that it simulates an early media scenario.
Set up your SIP phone to point to the Web Application Server. Configure the SIP phone address (i.e. user name) to DlgcEarlyMediaBridgeDemo. Make sure that the Web Application Server is running the dlgmsc_tests.war application.
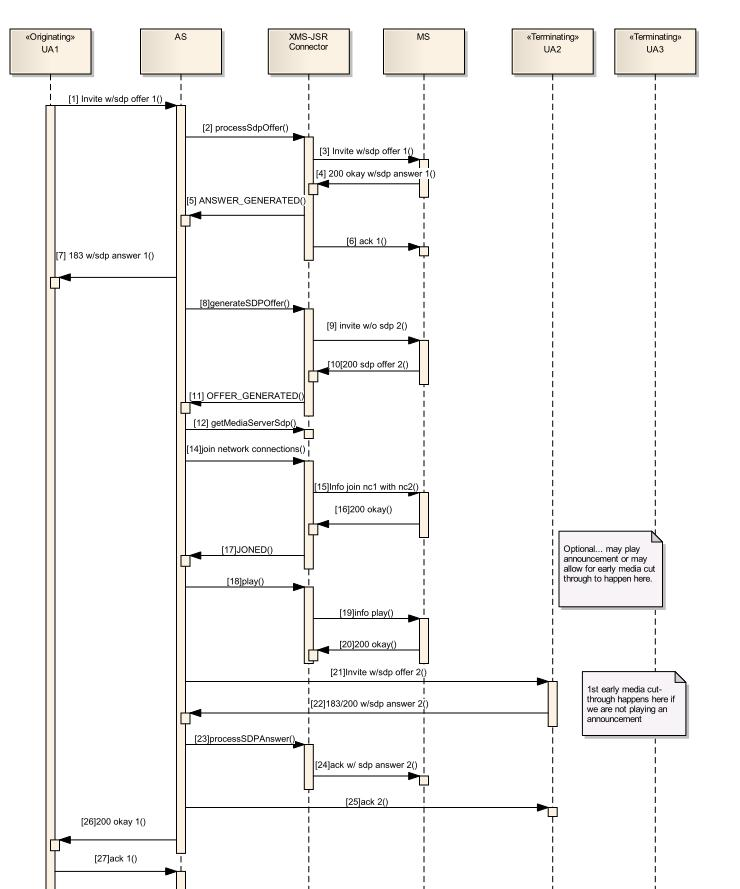
The following sequence diagram illustrates DlgcEarlyMediaBridgeDemo:
Menu Supported by DlgcEarlyMediaBridgeDemo:
*00 - Plays announcement of menu options
*77 - Plays announcement of how the demo works
*88 - Plays announcement informing the user if the application is in a bridge or mixer conference
*99 - Transfers the two call leg from a bridge conference to a full conference using a mixer.
Note: Once in a mixer conference, the test application does not allow you to go back to a bridge conference.
To test the application, dial the following:
DlgcEarlyMediaBridgeDemo@<OCCAS5-IP-ADDRESS>