In the Configuration section, you can configure the following types of parameters:
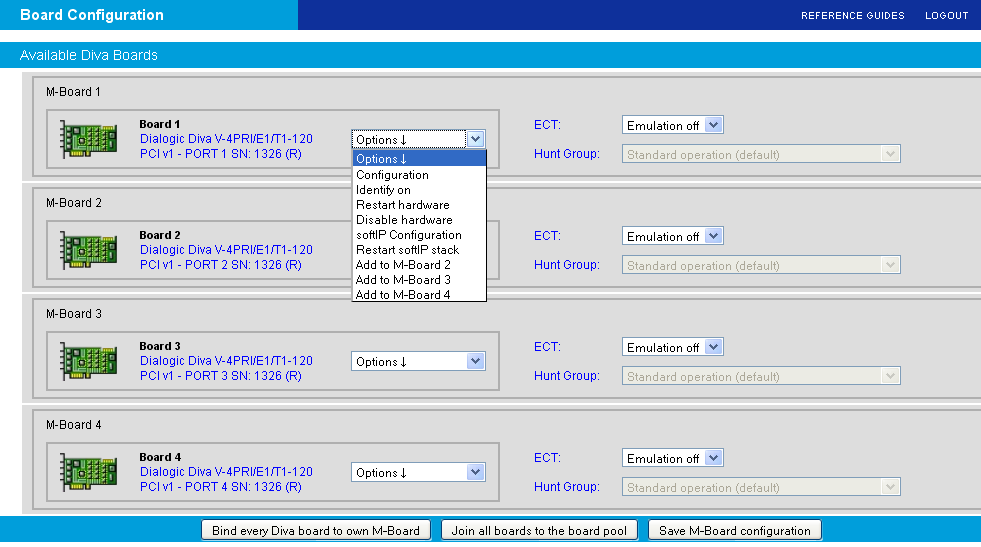
If you click Board configuration on the left side, the following page opens.
This page allows you to:
Create/change the configuration of the Diva Media Boards or the Diva softIP board. To do so, either click the highlighted name of the board or select Configuration or softIP Configuration from the drop down menu next to the board name to open the Board Configuration - Detail page. For more information, see the description below the screen.
Note: The option softIP Configuration is only available in the drop down menu if the softIP and a Diva Media Board are used in Resource board mode. For more general information, see Using Dialogic® Diva® Media Boards as DSP Resource Boards with Dialogic® Diva® softIP for SIP Software. For information about how to combine both boards see further below.
To open the softIP configuration when used as standalone product, you need to click the highlighted name of the softIP line to configure.
Identify a Diva Media Board. To do so, select Identify on from drop down menu next to the board name. With this option activated, the LEDs of the Diva Media Board are set to blink so that you can simply identify the board for connecting it to the correct cable.
Restart the selected Diva Media Board if necessary, e.g., after the configuration of certain parameters. To do so, select Restart hardware or Restart softIP stack from the drop down menu next to the board name.
Disable the selected Diva Media Board if necessary. To do so, select Disable hardware and the Diva Media Board is unloaded from the system and layer 1 gets disconnected.
Add a Diva Media Board to an M-Board. The benefits of the M-Board are described in the General features section. To so so, select Add to M-Board <x>, where <x> stands for the M-Board Number to which you want to add the board.
Note: If you join a softIP board and a Diva Media Board to an M-Board, the Diva Media Board is not used as DSP Resource Board but keeps functioning as conventional TDM board.
Remove a Diva Media Board from the M-Board. To do so, select Remove from M-Board.
When you select Configuration or click the name of the Diva Media Board, the Board Configuration - Detail page opens and you may configure the basic and extend parameters of the Diva board. To see the extended parameters, select Yes next to View Extended Configuration.
Among others, the Board Configuration - Detail page allows you to combine a Diva Media Board and a Diva softIP board to use the Diva Media Board as DSP resource board. To do so, select Resourceboard mode next to Interface Mode/Resource Board and click Save.
Note: Once the line of the Diva softIP board is combined with the Diva Media Board, the softIP board is no longer shown in the Board Configuration page and an (R) is added at the end of the name of Diva board. To configure the softIP board, click the drop down menu next to the resource board and select softIP Configuration.

As soon as the configuration process is complete, click Save to update the Diva Media Board configuration. The Diva Media Board configuration utility tries to update the changed configuration parameters on demand, i.e., without a board restart. If the changed parameters cannot be updated in this way, the Dialogic® Diva® WEB server will ask you to restart the Diva Media Board.
This feature is only available on specific Diva BRI and V-xPRI Media Boards. Clock synchronization may be necessary, if one port of the Diva multiport Media Board is connected directly to the ISDN line and the other ports are connected to the PBX, so that the clocks of the ports may drift. With the clock synchronization, the ports configured as NT are synchronized with the TE ports on the same Diva Media Board.

To synchronize the ports, you have two options:
You can synchronize the configured NT ports to one selected TE port. If you use this mode, either port 1 or 3 needs to be configured as TE. Select one of the TE ports under NT-ClockSync.
In a specific monitoring configuration, NT port 2 is synchronized with TE port 1 and NT port 4 is synchronized with TE port 3. In this configuration, port 2 and 4 must be NT and port 1 and 3 must be TE. If you use such a configuration, select Monitor Mode under NT-ClockSync.
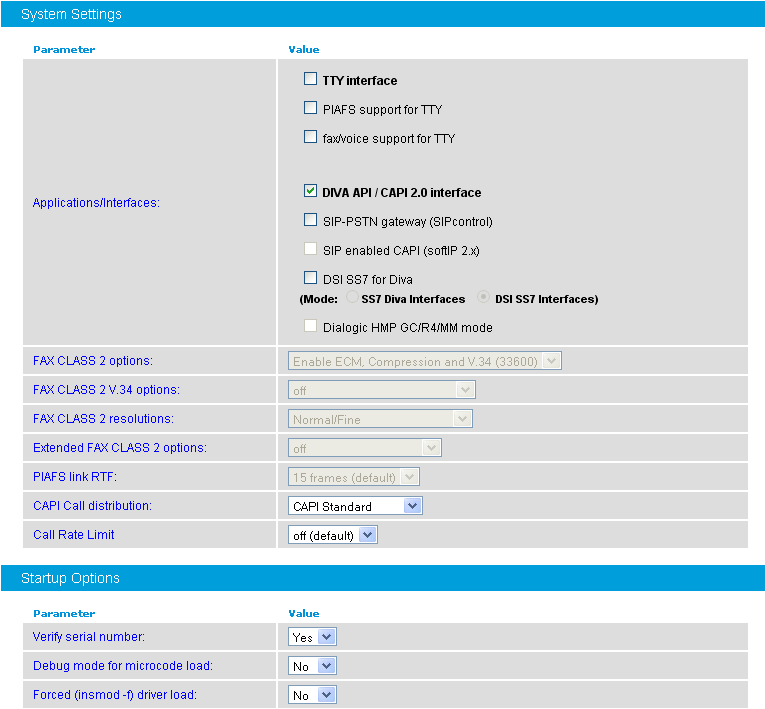
If you click System configuration on the left hand side, a page opens that allows you to configure global system parameters that affect the installed boards and device drivers, to optimize the configuration of your system, such as Fax-, RAS-, or Voice server, to select the applications and interface drivers to be loaded (CAPI, TTY), and to control misc. system services (accounting, etc.).
Note: The activation of the SIP-PSTN gateway (Diva SIPcontrol software), the SIP enabled CAPI (Diva softIP software), the DSI SS7 for Diva support (Dialogic® DSI SS7 for Diva® Media Boards), or specific features on the Diva Media Boards require a valid license. See License Activation for more information.
This page allows you to configure number ranges, different targets (CAPI/DSAPI vs. TTY), and different kinds of call distributions. You may configure the call routing for each controller. Note that if the first rule for a called party number matches, the remaining rules for the same number are ignored.
Note: If you select to configure the call routing, the parameter Direct Dial In (NT2) is automatically set to Yes.
To configure the call routing options:
Select Advanced from the dropdown menu and click Save. A page appears confirming that the selection was saved.
Click Call Routing configuration again and the Advanced configuration menu appears.
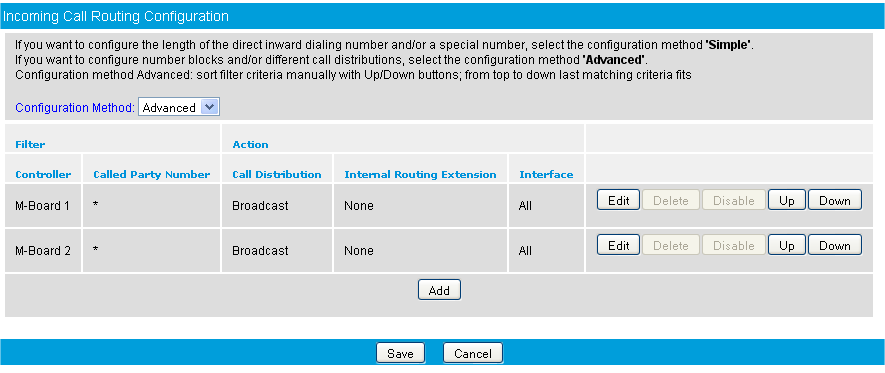
Click Edit to configure the necessary settings.
Use the wildcard character "*" if any Called Party Number should be matched. You can also enter a single number or a range of numbers.
Select the controller to be used for the call routing. If you select Any and you may create a common call routing for all installed controllers.
Under Call Distribution, select how the call should be handled. If you select Broadcast, the call is routed to the running applications on all interfaces. If you select Forward to, you need to enter the number to which the call should be routed and you need to select an interface.
For more information, see the online help for each parameter.
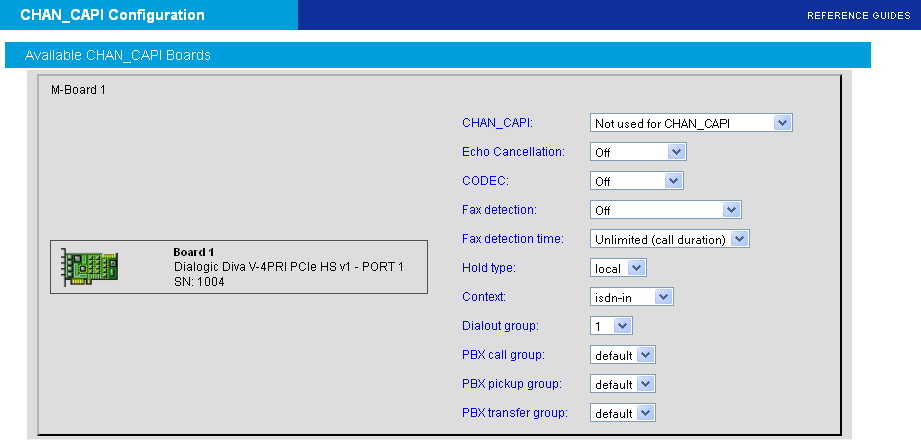
The Diva System Release is compatible with the CHAN_CAPI Asterisk interfaces. The CHAN_CAPI is a specific use case to provide CAPI-based ISDN hardware support. It establishes the connection between the PBX software and ISDN hardware, which provides a CAPI 2.0 compatible interface.
During the installation of the Diva System Release LIN software, the installation process detects automatically if Asterisk is installed and if the header files to build the CHAL_CAPI driver are available.
If Asterisk is installed, the user will be asked if the CHAN_CAPI driver should be build. After confirmation, the build process automatically detects the installed Asterisk version and creates and installs the required CHAN_CAPI driver.
If Asterisk is not installed, the documentation for using Asterisk with Diva is available in the web configuration. Asterisk may be installed or updated after the Diva System Release is installed. In this case, the build process for the Diva System Release can be started again and will create and install the CHAN_CAPI driver.
The CHAN_CAPI configuration generates a capi.conf Asterisk configuration file and modifies the modules.conf and makes the available options visible. You need to write your own extension.conf. Consult the examples in the internet for reference. For Diva-specific commands, see the README, README.media, README.Diva.fax, and README.Diva.qsig files.
Notes:
If a new capi.conf is generated, the old version is saved as capi.conf.saved_by_diva.
The DTMF parameters are set to 80ms Tone/Gap Duration and are detected by the DSP if the capi.conf is configured via the WEB configuration interface.
MF and other tones can be detected. See the readme.media file for more information.
If you use Asterisk 1.6, do not activate RTP support.
To open the online help for a specific parameter, click the parameter and a window with the help text will pop up.